
Stainless steel scratch repair: What to do when your new appliance gets scratched [2023]
This post includes affiliate links to Amazon and other vendors. I may earn commission from purchases made through these links. However, the views and opinions here are my own..
Does this sound familiar: you blew the kitchen and cabinet renovation budget on a high end stainless steel stove or range? Maybe it’s a Thermador or a Viking or a Wolf. Or maybe it’s a Miele or GE. Whatever it is, you tried to keep it safe from damage, but somehow it got scratched…
This happens much more often than you may think. Contractors, in their haste to complete the job, or plumbers in moving the stove, or the kids while playing ball in the house cause a visible scratch to appear on your expensive appliance.
So what should you do? The good thing is that the scratch is generally repairable — but the repair isn’t easy, and it can be expensive.
In this article, we look at several options for stainless steel scratch repair, and we try to help you understand the cost.
Table of Contents
- How to repair a scratch for specific appliances
- Stainless steel scratch repair options
- Stainless steel scratch repair using a kit
- DIY stainless steel scratch repair using professional tools
- Finding a professional to do stainless steel scratch repair
- Stainless steel scratch repair Atlanta
- Stainless steel scratch repair Boston
- Stainless steel scratch repair Chicago
- Stainless steel scratch repair Colorado (Boulder, Denver)
- Stainless steel scratch repair Hartford
- Stainless steel scratch repair New York
- Stainless steel scratch repair Los Angeles
- Stainless steel scratch repair Tennessee (Chattanooga, Memphis)
- Stainless steel scratch repair San Diego
- Stainless steel scratch repair Irvine, CA
- Stainless steel scratch repair Florida (Orlando, Miami, Jacksonville, Tampa)
- Stainless steel scratch repair Las Vegas
- Stainless steel scratch repair Portland
- Stainless steel scratch repair Washington (Seattle, Spokane)
- Stainless steel scratch repair Philadelphia
- Stainless steel scratch repair Phoenix
- Stainless steel scratch repair Texas (Dallas, Fort Worth)
- Stainless steel scratch repair San Francisco
How to repair a scratch for specific appliances
| Item | How to repair a scratch |
| Stainless steel range, stove or oven | Can generally be re-brushed, or use a scratch repair kit |
| Stainless steel dishwasher | Generally needs front panel replacement |
| Stainless steel refrigerator | Generally needs door replacement |
| Sink | Can generally be re-brushed, or use kit |
| Faucet | Can sometimes b re-brushed, or use kit |
Before you try to re-brush or repair any appliance, make sure it is real stainless steel with no coating. Often, refrigerators and dishwashers have a coating on them, which makes home repair not feasible.
Also, make sure your appliance has a #4 brushed finish. Most stainless appliances have a #4 finish, but there are some outliers. In addition, the #4 finish can vary slightly between appliance manufacturers, so you generally won’t be able to re-brush only a tiny scratched area. You generally need to re-brush the entire panel.
Stainless steel scratch repair options
There are three options for stainless steel scratch repair for your appliance. The first option is using a repair kit and doing it yourself. The second option is doing it yourself with the professional tools. And the third option is to find a professional who will do it for you.
Unfortunately, none of these options are particularly easy. We will look at each option and the benefits and drawbacks.
Stainless steel scratch repair using a kit
It is possible to repair surface scratches in your stainless steel appliances using a repair kit. These repair kits are available at Amazon and other retailers. There are three main repair kit options:
- Scratch-B-Gone
- Rejuvenate Stainless Steel Scratch Eraser Kit
- Scratch Pro Kit for Polishing and Repairing Sinks
Scratch-B-Gone
Scratch-B-Gone is the oldest option here, but it is tough to find. You can still get it on eBay and Amazon. I have used this many times on my Thermador stainless range. It’s very similar to the Rejuvenate kit — so similar that I would just buy the Rejuvenate kit, which is much cheaper.
Rejuvenate Stainless Steel Scratch Eraser Kit
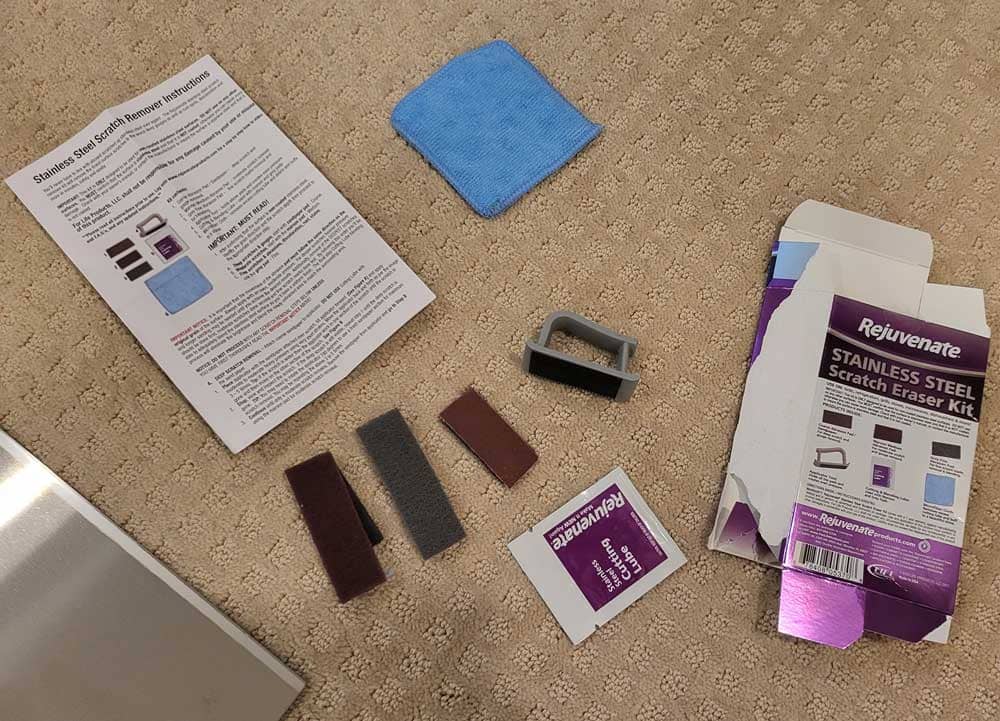
The Rejuvenate Stainless Steel Scratch Eraser kit costs only around $10. It is the cheapest of the options, and it seems to have the same components as the Scratch-B-Gone kit. We do a full comparison of the kits here.
Scratch Pro Kit for Polishing and Repairing Sinks
This is a different kit, since it is designed for use with sinks. Nevertheless, many people have used it on appliances and have had good luck. We test it and do a full comparison of it against the Rejuvenate and Scratch-B-Gone separately.

We used this kit, and didn’t have much success. For details about what we did and the results, click here.
DIY stainless steel scratch repair using professional tools
When your appliance came out of the factory, the stainless steel sheet metal was brushed — often by a person (not by a machine). So it’s definitely possible to re-brush the stainless steel in your appliance yourself.
However, you need some specialist tools:
- A metal drum sander/polisher
- A special drum for doing #4 brushing
- Some test metal
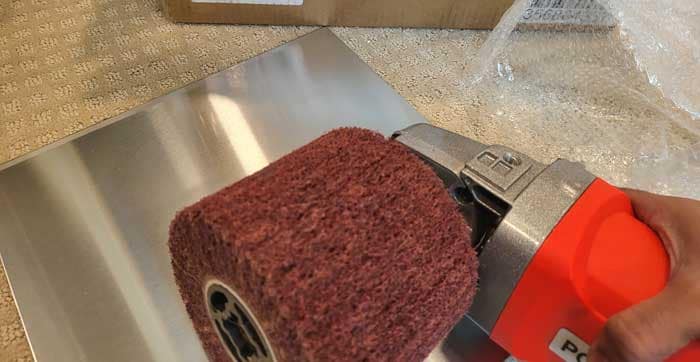
Metal drum sander/polisher
The first tool you need is a metal drum sander. There are two that are relatively easy to get and we found to work reasonably well. The first one is the Walter Line-Mate III. This one works extremely well, and is the one many professionals use. I found that this tool is sturdy and has the power to create a nice brushed finish in our stainless tests.

However, there’s a huge drawback to this one. It’s very expensive — and for a single repair, it definitely doesn’t seem worth it. That being said, if you’re trying to repair a $15,000 Wolf or Viking range, and you can’t find a local professional (see below), it may be a viable investment.
The good news is that there is a cheaper alternative. Amazon (and other retailers) sell a generic drum brush. It’s around $150 and can work well enough — if you get the right brush.

In using the two, I saw a slightly better finish from the Walter tool, although the difference wasn’t huge. Being a novice, who has never previously brushed stainless before, I found both of the tools gave me a similar result. The limit here was my experience, as opposed to the quality of the tool.
Brushing drum
There are several brushes available to do the #4 finish, but you will want to use a forgiving, easy to use brush.

We used the Walter 2-in-one finishing brush. This brush works really nicely to create a beautiful #4 finish. In fact, it’s reasonably forgiving even for inexperienced users. The most important thing is to do steady, straight strokes across the metal, without jerking or sideways movement.
I wasn’t able to get a good video of the brush in use, but Walter has a video that shows the correct way to use it.
Test metal
Test metal is absolutely vital if you’re trying to perform any kind of stainless steel scratch repair. We purchased #4 brushed metal pieces from Amazon, which you can get here.
When you purchase test metal, make sure it’s thick enough to handle the brushing (the stuff you get at Home Depot isn’t), and that it has a similar brushed appearance to your appliance.
Repair steps
To repair a small scratch in your stainless steel appliance, do the following
- Get your test metal and make a similar scratch to the one on your appliance (stove, etc).
- Make sure that the direction of the scratch and depth math the scratch on your appliance.
- Install the Walter 2-in-1 brush on the drum sander/polisher. Make sure it’s secured well, as movement during brushing can ruin the finish.
- Run the drum sander/polisher across the test metal in long straight strokes along the grain. Don’t press down on the drum sander/polisher — let its weight do all the work.
- Brush the entire surface of the test metal.
- Once you’ve done the surface, check it to see how it looks. Compare it to your appliance brushing to see if it’s sufficient.
- If you’re happy with the look, and the scratch is gone, you can start preparing the appliance.
- Clean the surface of the appliance well, removing all grease or dirt.
- Tape off all adjacent panels of the appliance with blue tape, and protect other surfaces of the appliance.
- Run the drum sander/polisher across the panel in long straight strokes along the grain. Don’t press down on the drum sander/polisher — let its weight do all the work.
- Brush the whole panel carefully, then check if the scratch is gone. If it is, you’re done. If not, you may have to repeat steps 8-11.
Result: was I able to repair the scratch in the stainless steel?
After a bunch of trial and error in the stainless steel, I was able to remove the scratch and make the panel look pretty good with both drum sanders and the Walter brush. In fact, in the picture below, you can’t see the damage at all.
However, if you look at the panel in person, you will notice that the brushing doesn’t look perfectly straight. It’s a little wavy, although I would bet that most people wouldn’t notice it.
In the end, it seems that using a drum sander is a viable way to repair your stainless steel appliance; however, you are much better off finding someone to do the repair for you, if possible. See below where I find people in many metro areas.
Finding a professional to do stainless steel scratch repair
As I wrote earlier, if you can, you should try to find a professional to do the repair for you. The problem is, it can be very hard to find someone. The problem is not that these people don’t exist — it’s that they are difficult to find with search.
For that reason, we have gone through and compiled a list of businesses and people who are in this type of business in many metropolitan areas. Note that these may not work on your particular appliance or situation, but this list should provide a starting point about where to search.
![Is a Viking range worth the money? [2024]](https://ml1fbh7p7uvu.i.optimole.com/w:730/h:445/q:eco/f:best/https://kitchenandbathdiy.com/wp-content/uploads/2022/09/20220905_150419-scaled-e1662404987566.jpg)
![The best stainless steel scratch repair kit: head to head test [2024]](https://ml1fbh7p7uvu.i.optimole.com/w:365/h:486/q:eco/f:best/https://kitchenandbathdiy.com/wp-content/uploads/2022/04/20220423_190335-scaled.jpg)
we are proud to offer our customers high-quality Wolf cooktop and rangetop repair services. Our team of experienced and certified technicians are ready to help you with any repair needs you may have, big or small